Sunday, February 6, 2011

Kempenfelt Quilter's Guild Tinners Project


1.  My Tinner...  "Quilter's Espresso"

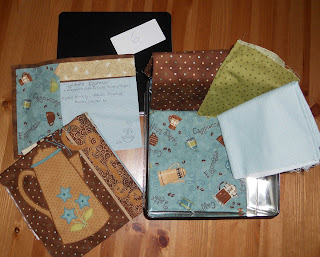
This project is challenge to our guild starting in February.  To participate, each person must make a central quilt block and choose a theme.  My choice is coffee.   I had purchase this great coffee print fabric, thinking I'd make myself an apron out of it, but was inspired to use it for this project instead.

We were also to make a label for participants to sign and place it all in a tin with 1m of main fabric and some fat quarters of coordinating prints.  At the meeting, our tins are all assigned a number and each month we take home the next higher number.  Mine was assigned #6, so next meeting I will take home tin #7.  Each month we are to add two border strips.  We will be told how wide they are to be made and what quilting technique.  We are to use  some of the fabric supplied in the tin and add some of our own.  The tins will be passed around 5 to 6 times and at the end we all get our own back to keep and finish off as desired.  I am hoping to use mine as a wall hanging in the kitchen.


I started with my label first. 
It gave me some inspiration for the main block.

This is my general plan for the central block.
I liked the idea for the awning along the top to give
the impression of a cafe.  The pattern pieces are copies 
of the printed fabric enlarged 400%.


I ended up making the fabric behind the word coffee
smaller than originally planned.  Because of this, I added
the striped edge to the side to give the block easier
dimensions to work with.

Finished block is 14.5" square.
A note of appreciation to fellow quilters. 
That and the inside of the tin was sticky and I wanted to cover it. 

My tin ready to send off.

When assembling the 4 pinwheels for December's block, I found out that I had joined the half triangle squares of one block together so that it spun in the opposite direction to the rest.  Rather than take the block all apart, it was easier to make  another one.  So now I have a spare pinwheel block.  Perhaps I will be able to find a use for it in the final quilt assembly. 

December's BOM
pinwheels

Oops!  An extra block, fins go in wrong direction.

January's block was far more difficult than the others.  It used a combination of techniques from the previous months blocks.  Somehow I made my seams just  a smidgen smaller than they should have been.  Now the final block  measures 17 by 17 instead of 16.5 square.  My points turned out perfect and I don't want to take it apart.  Perhaps I can make some adjustments when the final quilt top is assembled.  It was suggested that you do some featured quilting or applique in the large  triangle areas.  Hmmm.... will wait until more of the mystery is unravelled until I decide.  I am wondering about appliqueing a prairie rose, just because the quilt is titled A Prairie Sampler. 

January BOM
Diagonal Four Patch


Why make just one?

I enjoyed making my first small comfort quilt so much that when asked to join the ladies on Fridays, I jumped at the idea.  We meet every other Friday at Grove United Church in Barrie, Ontario, Canada to make comfort quilts to cover the isolettes in the neonatal unit in Royal Victoria Hospital.  We sew/quilt from 10am to 3:30pm and accomplish lots.  I am meeting more quilt guild members and have learned new tips, techniques and ideas. 
1   Some of them have been how to make half triangle squares by overlapping two fabric strips together, right sides facing, sew down both sides, center your ruler's 45 angle on the seam and rotary cut the two sides, flip open and press.  Then cut the next triangle form the opposite seam and alternate along the strip.

2  How to quilt as you go to make up the quilts even faster.  Joan showed me how to do the backing in squares, with one inch seams which you fold over in the front and top stitch down to look like sashing in the front.
3.  When sewing on bias when you come to a corner instead of stopping a quarter inch from the edge, turn the quilt and sew the seam along the 45 degree angle to the corner.  Then turn the corner fabrics as usual and continue along the next seam.

4.  During one of their meetings last year each person was asked to bring in 1m of fabric.  They cut that piece of fabric in half, put one half in their bag under the table and passed the other half to the left.  Then everyone took that half of fabric, cut it in half  again, kept one piece and passed the other to the left again.... and so on until everyone  had some of each fabric, but in different proportions.  The challenge was to make a quilt using all of those fabrics.  They were allowed to supplement with other fabrics two, but must use all the fabrics from the exchange.  Sounds like fun!

So far I have been to two sewing days and have made up the following two quilt kits.  This farm scene print quilt used a diagonal 4 patch pattern which was easy to do... a little more time consuming than the teddy bear one I made after it.  These were both made in January.

I loved the bight border print and simplicity of  this Teddy Bear quilt kit.  The wording on the border reads... "Everything in !"  How true.  I hope some child will come to love it as much as I had fun making it.

Thursday, February 3, 2011

More sewing/quilt projects from December

20.  A Half Apron for Katelyn

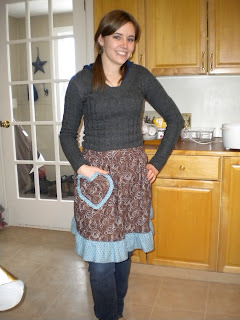
Katelyn and I spent part of a day, designing and sewing this half apron for her.  It was a fun Mother/Daughter time.  The star print on the ruffle is her favourite of the two fabrics.  I had fun making the ruffled heart pocket.  I don't think the apron is particularly functional, but it's cute!


21.  A Binder Cover

I made this quilted cover for my friend Trudy, for her 50th birthday.  I put some clear page protector sheets inside with a few patterns.  I also added a crib/craft sized pkg of warm and natural quilt batting.
I purchase the printed quilt panel 2 years ago and was just looking for the right idea for its use.  This cover turned out quite fun.  I have enough panel pieces left over to make two more binder covers.  Hmm... I'd like to make one or two for myself.


22.  Pink Purse for President's Challenge

At my first guild meeting, back in September, our president issued each member a challenge... to make a quilted item out of fabrics that matched the paint chip card in the sealed envelop that was placed on our seats at the start of the evening.  My original impression was that the pinks were outdated and that I'd never find anything to match.  Well, I was wrong.  The first store I walked in to had these two floral fabrics that had all the paint chip colours in them.  I designed this purse based on a wool one I saw in a library book.  I have made so many changes to it, that I don't think it qualifies as the same purse any more.  I believe, I can confidently call it my own design.  I added the pinwheels and stitched around some of the flowers in the fabric so that it would qualify as a quilted item, not just sewn.  I also added a cell phone pocket and a zippered pocket.

Although I did not win the Viewer's Choice at January's guild meeting, I have a cheery pink purse for spring and summer!  The paint chip card was a neat idea to use for selecting colours that will go well together.

Wednesday, January 5, 2011

The Next 2 Blocks

So I still don't have a clue as to what the final quilt will look like, but my curiosity is stirred.  I'm finding it a challenge to select fabrics when I don't even know which blocks go next to each other.  It is also liberating to have to let go of my control over design and colour selection.  Who knows how this quilt will look when completed?  It really is a mystery.


October BOM
Tree
November BOM
Four Patch / Broken Dishes